What Is Home Hardening? A Guide to Wildfire Safety
Get clear answers to what is home hardening, plus practical techniques and real-world costs to make your home more wildfire-resistant and safer.
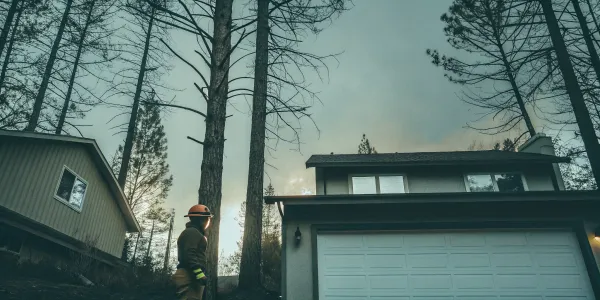
When you picture a wildfire, you probably see a massive wall of flames. But that’s not how most homes are lost. The real danger is a storm of tiny, wind-blown embers that can travel over a mile, landing on your roof or in your vents. This is where home hardening comes in. So, what is home hardening? It’s your direct defense against this ember threat—the process of sealing the weak points where a single spark could ignite your house. Think of it as giving your home a suit of armor, making it resilient enough to withstand a wildfire.
Key Takeaways
- Prioritize Ember Defense First: Since wind-blown embers ignite most homes during a wildfire, focus on the most effective, low-cost fixes first. This includes installing 1/8-inch metal mesh on all vents and consistently clearing flammable debris from gutters and the five-foot zone around your foundation.
- Combine Structural Upgrades with Smart Landscaping: A fire-resistant home needs a fire-resistant yard. Pair structural improvements like a Class A roof and non-combustible siding with a well-maintained defensible space to create a layered defense that protects your property from both intense heat and embers.
- View Hardening as a Long-Term Investment: Home hardening is a strategic project that pays off over time. Create a phased plan to manage expenses, knowing these upgrades can lower insurance premiums, increase your property value, and provide invaluable peace of mind.
What Is Home Hardening and Why Does It Matter?
Let's talk about "home hardening." It might sound like a big, technical term, but the idea is simple: it’s the process of making your home and the area around it more resistant to wildfires. Think of it as giving your house a suit of armor against embers and flames. This involves making smart upgrades with fire-resistant building materials and creating a well-maintained buffer zone—what experts call defensible space—around your property. The main goal is to protect your home from the two biggest threats during a wildfire: the intense, radiant heat and the storm of flying embers that can land on your roof or get into small cracks and start a fire.
Why does this matter so much? In areas prone to wildfire, hardening your home is one of the most powerful steps you can take to safeguard your property and, most importantly, your family. It’s not just about surviving a fire; it’s also about peace of mind. Plus, as insurance companies become more selective in high-risk areas, having a hardened home can make a real difference in your ability to get and keep affordable coverage. It shows you’re taking proactive steps to reduce risk, which is exactly what insurers want to see. It’s a practical investment in your home’s resilience and your financial security.
It's Not Just Flames: How Wildfires Threaten Homes
When you picture a wildfire, you probably imagine a huge wall of flames. While that’s certainly a danger, it’s not how most homes actually catch fire. The real culprits are often tiny, wind-blown embers that can travel a mile or more ahead of the main fire. Research shows that up to 90% of homes destroyed in wildfires are ignited by these small, burning embers, not by direct contact with the flames. These embers act like tiny torches, landing in gutters clogged with leaves, on flammable doormats, or getting sucked into attic vents. If they find even a small spot of flammable material, they can easily start a new fire, putting your home at risk even if the wildfire itself seems far away.
Understanding the Home Ignition Zone
This brings us to the Home Ignition Zone, or HIZ. It’s the area that includes your house and everything around it, extending out about 100 to 200 feet. This is the zone that matters most when a wildfire approaches, as it’s where the condition of your home and landscaping determines whether your property will survive. Think of it as your home’s personal defense perimeter. By focusing your efforts here—clearing away flammable materials and making smart structural upgrades—you create a buffer that can starve a fire of fuel. This is the core principle of defensible space and home hardening; they work together within the HIZ to give your home its best chance of survival.
How Embers Ignite a Home
So, how does a tiny ember actually set a house on fire? It’s usually a slow, sneaky process. Embers are light enough to be carried by the wind into the smallest openings. They get sucked into attic or foundation vents that aren't properly screened, where they can ignite insulation or debris. They also accumulate in gutters filled with dry leaves and pine needles, smoldering for hours before igniting the roof's edge. An ember can also land in a bed of dry mulch right next to your siding, on a flammable doormat, or on a wooden deck, where it can slowly burn until it finds a way into the structure. Most homes lost to wildfire aren't consumed by a massive wall of flames; they're ignited by these small, persistent embers finding a single weak spot.
Creating a Fire-Resistant Shield for Your Home
This is where home hardening really makes a difference. By taking specific steps to harden your home, you dramatically lower the chances of those embers finding a place to ignite. It’s about creating a "layered defense" that combines smart material choices for your home’s exterior with careful maintenance of your yard. For example, using non-combustible siding or covering vents with a fine metal mesh can stop embers in their tracks. While no single action can make your home completely fireproof, combining several home hardening strategies gives your property a much better chance of surviving a wildfire. It’s about systematically removing the weak points where a tiny ember could cause a catastrophe and stacking the odds in your favor.
Your Home Hardening Checklist: 5 Key Upgrades
Home hardening is all about making your house itself more resistant to catching fire. Think of it as strengthening your home’s armor against the two biggest threats from a wildfire: flying embers and intense heat. It’s a common misconception that homes only burn when the main wall of fire reaches them. In reality, the vast majority of homes lost in wildfires are ignited by embers—tiny, wind-blown pieces of burning debris that can travel a mile or more ahead of the flames. These embers are the real troublemakers, landing in gutters, under decks, and on flammable roofing, where they can smolder and start a new fire.
The goal of home hardening is to address the weak points where these embers can take hold. By focusing on the most vulnerable parts of your home’s exterior—like the roof, siding, vents, and windows—you can create a structure that is much more likely to survive a wildfire, even if you aren’t there to defend it. This isn't just about surviving a fire; it's about preventing your home from becoming fuel in the first place. These upgrades work hand-in-hand with creating defensible space to give your property its best possible chance. Let’s walk through the most impactful changes you can make.
Start at the Top with Fire-Resistant Roofing
Your roof is the single most vulnerable part of your home during a wildfire. It’s a large, exposed surface that can easily catch falling embers. If you have an old roof made of materials like wood shakes, it’s a serious liability. Your best defense is to use Class A fire-rated roofing materials. When it’s time for a replacement, you should choose smart materials that resist fire, such as asphalt composition shingles, clay or concrete tiles, slate, or metal. These materials are specifically designed to withstand high heat and prevent embers from burning through into your attic, giving your home a strong and essential first line of defense.
Protect Your Walls with Non-Combustible Siding
The siding is your home's skin, and it needs to stand up to the intense radiant heat from a nearby fire. Wood or vinyl siding can ignite easily, melting or burning away to expose the structure underneath. To harden your home, it’s best to replace these with non-combustible alternatives. Materials like stucco, fiber cement siding, brick, and stone are excellent choices because they don’t burn. Making this switch is a significant investment, but it creates a powerful barrier that can stop a fire from ever taking hold of your walls. It’s a foundational part of building a truly fire-resistant home.
Secure Your Entry Points: Windows and Doors
Windows and doors are potential weak spots where fire can find its way inside. The intense heat from a wildfire can cause single-pane glass to shatter, allowing embers to blow directly into your home. Upgrading to dual-paned windows, especially with tempered glass, makes them much more resilient to breaking under extreme heat. For doors, a solid-core wood or metal door offers far more protection than a hollow one. Also, take a moment to check the weather stripping around your doors and garage doors to ensure a tight seal that keeps embers out. These small details can make a huge difference when every barrier counts.
Install Metal Mesh Screens
Your home needs to breathe, but vents in your attic, foundation, and under your eaves can be direct highways for embers. Think of them as open doors during a wildfire. Embers are lightweight and can easily be sucked into these openings, where they can ignite insulation, dust, or stored items. The solution is straightforward and one of the most effective, low-cost hardening measures you can take. You need to cover all vent openings with fine metal mesh. This simple barrier stops embers from getting inside while still allowing for necessary airflow. Be sure to use 1/8-inch or 1/16-inch metal screening, as anything larger won't stop the smallest embers. And definitely avoid plastic or fiberglass mesh, which can melt or burn right through.
Seal Gaps Around Doors and Siding
Embers are relentless and can find their way into the smallest openings. Walk around your home and look for any gaps larger than 1/8 of an inch, especially where different materials meet. Check your exterior siding for any holes, rot, or cracks, and look for openings in your eaves. These small vulnerabilities can be sealed with caulk or other appropriate fillers. Pay close attention to your garage door, which is often a major weak point. Use weather-stripping to create a tight seal along the bottom and sides. Sealing these gaps is a critical step to become more ember-aware and deny them an easy entry point into your home's structure.
Keep Embers Out of Your Gutters
Gutters are a classic trap for embers. They fill up with dry leaves, pine needles, and other flammable debris, creating a perfect line of kindling right along your roof’s edge. If an ember lands there, it can quickly ignite a fire that spreads to your eaves and attic. The solution is simple but critical: keep your gutters clean. You should clear them out regularly, especially before and during fire season. For a more permanent fix, consider installing non-combustible gutter guards. These systems prevent debris from building up while still allowing water to flow, effectively removing the fuel source from your roofline.
Consider Metal Gutters
While keeping your gutters free of debris is a crucial first step, the material they're made of matters just as much. Plastic or vinyl gutters can melt or even catch fire when exposed to intense heat or a shower of embers, creating a new pathway for fire to reach your roof’s edge. For a more durable defense, consider upgrading to metal. As fire safety experts at CAL FIRE recommend, replacing plastic gutters with non-combustible metal ones is a key home hardening strategy. This simple switch ensures that even if embers land in your gutters, the gutter itself won't become fuel for the fire, providing a much stronger layer of protection for your eaves and roof.
Seal Your Home with Ember-Resistant Vents
Vents are necessary for your home’s attic and foundation to breathe, but they’re also open doorways for embers. These small openings in your eaves, soffits, and foundation can suck embers inside, where they can ignite flammable materials in your attic or crawlspace. The most effective way to fix this is to cover all vent openings with a fine metal mesh screen with openings of 1/8-inch or smaller. This simple, low-cost upgrade allows air to flow but is small enough to block embers from getting through. It’s one of the most important and affordable home hardening tasks you can tackle.
Use Fine Mesh Screens
While sealing vents is crucial, the type of screen you use is what makes the difference. Standard insect screens are often made of plastic or fiberglass, which can melt or burn away under the intense heat of a wildfire, leaving a wide-open path for embers. To properly harden your home, you need to cover all vent openings with 1/8-inch or 1/16-inch metal mesh. This fine, non-combustible screen is strong enough to block wind-blown embers while still allowing your home to have proper ventilation. It’s a relatively inexpensive and straightforward upgrade that you can often do yourself, and it addresses one of the most common ways homes ignite during a wildfire.
Fortify Eaves and Chimneys
Two areas that often get overlooked in home hardening are the eaves and the chimney. Eaves, the part of the roof that overhangs the walls, can act like traps for hot air and embers, allowing fire to creep into your attic. A chimney, by its very nature, is a direct opening into your home. Both of these features require specific attention to ensure they don't become entry points for fire. Securing them properly closes off critical vulnerabilities and strengthens your home’s overall defense system against an ember attack. Let's look at how to address each one.
Box in Open Eaves
If you look up at the underside of your roof’s overhang and can see the structural rafters, you have open eaves. This design is a major fire hazard because it creates small nooks where embers and hot gases can get trapped against the house, easily igniting the roof sheathing and framing. The solution is to "box in" the eaves by covering the open space with non-combustible materials like fiber cement or stucco. This creates a flat, sealed surface known as a soffit, which eliminates those dangerous collection points and gives embers nowhere to hide, forcing them to blow past your home instead of getting stuck.
Install a Spark Arrestor on Your Chimney
An open chimney is like leaving a window wide open for embers. To prevent them from falling down into your home, you need to install a spark arrestor. This is a metal screen that fits over the top of the chimney flue, acting as a protective cap. According to the Los Angeles Fire Department, this device must have mesh openings between 3/8-inch and 1/2-inch to be effective. A spark arrestor serves a dual purpose: it stops wildfire embers from getting into your house, and it also prevents hot sparks from your own fireplace from getting out and potentially starting a fire in your yard or on your roof.
Secure Your Garage
The garage is one of the most vulnerable parts of a home during a wildfire. It’s often full of flammable materials—from gasoline and propane tanks to paint thinners and piles of cardboard boxes. The garage door itself is a large, uninsulated surface with gaps that can easily allow embers to blow inside. Once a fire starts in the garage, it can spread incredibly fast to the rest of the house, often moving through the shared attic space. Taking a few key steps to secure this area is a critical part of a complete home hardening strategy.
Weather-Strip the Garage Door
The small gap at the bottom and sides of your garage door is more than enough space for a flurry of embers to get inside. Once they’re in, they can ignite stored items like old rags, cardboard, or spilled fluids, quickly turning your garage into an inferno. You can easily seal these gaps by installing or replacing the weather-stripping on the bottom and sides of the door. This creates a tight seal against the ground and the door frame, effectively blocking embers from blowing in. It’s a simple, low-cost weekend project that closes a major entry point for wildfire.
Store Flammable Materials Safely
Your garage shouldn't be a storage unit for highly flammable liquids and materials. Items like gasoline cans, propane tanks for your grill, and paint thinners are extremely volatile and can act as an accelerant if a fire starts. The best practice is to store these materials in a detached shed located at least 30 feet away from your home. If that’s not an option, make sure they are stored in approved metal safety containers and kept away from other combustible items and potential ignition sources. Clearing out this fuel source is a free, immediate action you can take to reduce your home’s risk.
How Much Does Home Hardening Cost? A Realistic Breakdown
Thinking about home hardening can feel overwhelming, especially when it comes to the budget. It’s helpful to view these expenses not just as costs, but as long-term investments in your home’s safety and your family’s peace of mind. The total price tag can vary widely depending on your property’s size, location, current condition, and the materials you choose. Some upgrades are affordable weekend projects, while others are significant renovations.
The key is to start somewhere. You don’t have to do everything at once. By breaking down the costs, you can create a realistic plan that fits your budget and timeline. Prioritizing the most vulnerable parts of your home first will give you the biggest impact for your money. Below is a realistic look at what you can expect to spend on the most effective home hardening projects, from small fixes to major overhauls.
The Cost of a Fire-Resistant Roof: $5k–$15k
Your roof is your home's first line of defense against falling embers, which are the primary cause of home ignition during a wildfire. If your roof is made of flammable materials like wood shake, replacing it is one of the most important steps you can take. The goal is to use Class A fire-rated materials, such as asphalt shingles, metal, slate, or tile. While this is a significant investment, a fire-resistant roof dramatically improves your home’s ability to survive a wildfire. This upgrade not only protects your property but can also be a major factor in securing and maintaining homeowners insurance.
Investing in Safe Siding: $8k–$25k
The exterior walls of your home are highly exposed to radiant heat and direct flames. If your home has combustible siding, like wood or vinyl, embers can get trapped in cracks and ignite the structure. Upgrading to non-combustible materials is a powerful way to harden your home. Options like fiber-cement, stucco, and brick are excellent choices because they don’t burn. While replacing siding is a major project, it creates a strong, fire-resistant shell around your home. It’s a crucial step for properties in high-risk areas and can make a huge difference in how your home withstands a wildfire.
Budgeting for Secure Windows and Doors: $3k–$12k
Windows are often the most vulnerable part of a home during a wildfire. The intense heat can cause single-pane glass to shatter, allowing embers and flames to enter. Upgrading to dual-pane windows with tempered glass on the exterior pane provides a much stronger barrier. It’s also important to check your doors. A solid-core exterior door offers more protection than a hollow one. Don’t forget the small details, either. Ensure all your windows and doors have tight seals to prevent embers from slipping through the cracks. These upgrades are vital for keeping the inside of your home safe from ignition.
Affordable Upgrades: Vents and Gutters for $500–$2k
Embers are small, lightweight, and can travel for miles, easily finding their way into your home through vents. Attic, soffit, and foundation vents are open invitations for embers to get inside and ignite your house from within. Fortunately, this is one of the most affordable and effective fixes. You can install 1/8-inch metal mesh screening over all vent openings to block them. Gutters also pose a risk by collecting flammable debris like leaves and pine needles. Installing non-combustible gutter guards can prevent this buildup, removing a potential fuel source right next to your roofline.
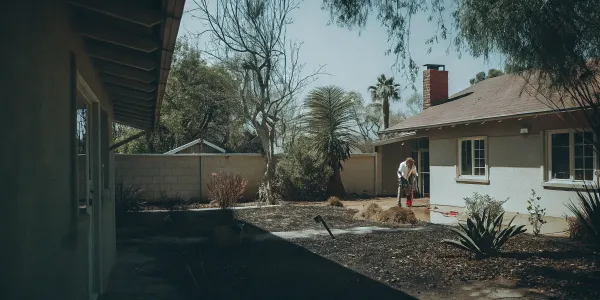
Creating Defensible Space: $1k–$8k
Creating defensible space is about managing the vegetation around your home to reduce fuel for a fire. This is a critical part of any home hardening strategy. The cost can vary greatly depending on the size of your property and the density of the vegetation. It might involve hiring a professional crew to remove trees, clear brush, and trim limbs. For smaller properties, it could be a DIY project spread over a few weekends. This work includes creating a non-combustible zone immediately around your home with materials like gravel or pavers and choosing fire-resistant landscaping for the rest of your yard.
How to Create Effective Defensible Space
Beyond strengthening your home itself, the single most important thing you can do to protect it from wildfire is to create defensible space. Think of it as a buffer zone you create between your home and the wildland around it. This managed space is designed to slow or stop the spread of wildfire, giving your home a fighting chance and providing a safer area for firefighters to work. It’s not about clear-cutting your property; it’s about smart, strategic management of vegetation and other flammable materials.
Creating this space involves dividing your property into zones, each with its own set of rules. The goal is to systematically reduce the amount of "fuel" a fire has to burn as it gets closer to your house. By creating fuel breaks between plant groupings and choosing the right species, you can significantly lower your home’s risk. This is one of the most empowering and effective actions you can take, and it’s a foundational part of living safely in a wildfire-prone area.
Clear Zone 1: The First 30 Feet Around Your Home
This zone is your home’s last line of defense, and it requires the most attention. The first five feet surrounding your home should be an ember-resistant zone, meaning it should contain nothing combustible. Use non-flammable materials like gravel, pavers, or concrete right up against your foundation—no bark mulch or flammable plants.
From 5 to 30 feet, the landscape should be "lean, clean, and green." Remove all dead grass, leaves, and pine needles from your yard, roof, and gutters. Trim tree branches so the lowest limbs are at least 6 to 10 feet from the ground. Make sure no branches touch or hang over your roof. Relocate firewood piles and propane tanks at least 30 feet away from your home and other structures.
Manage Zone 2: From 30 to 100 Feet Out
In this outer zone, your goal is to interrupt the fire's path and reduce its intensity. You don't need to remove all vegetation, but you do need to thin it out. The idea is to create space between trees and shrubs to prevent a fire from easily jumping from one to the next.
Cut or mow annual grasses down to a maximum height of four inches. Create horizontal space between shrubs and trees, and remove smaller trees that are growing between larger ones. This creates a landscape where fire has to work harder to find fuel, slowing it down and lowering its flame height. This makes the fire less of a threat by the time it reaches your more meticulously managed Zone 1.
Plant Smart: Your Guide to Fire-Resistant Landscaping
A fire-safe yard can still be beautiful. The practice of fire-resistant landscaping, or "firescaping," is all about making smart choices. It combines thoughtful plant selection, strategic placement, and regular maintenance to create a defensible space that helps protect your home.
Opt for plants that are high in moisture and less likely to ignite, such as succulents or native perennials. Avoid plants with high oil or resin content, like juniper, pine, and rosemary. You can also use hardscaping features like stone retaining walls, gravel paths, and patios to create stylish and effective fuel breaks. Remember that even fire-resistant plants need care. Keep them watered and regularly prune away any dead material to ensure they remain a protective feature of your landscape.
Hardening Beyond the House: Decks, Fences, and Sheds
Your home hardening efforts shouldn't stop at your foundation. Other structures on your property, especially those attached to your house, can act like fuses that lead a fire right to your door. A wooden deck, a fence connected to your siding, or even a nearby shed can become a major liability during a wildfire. Embers can easily get trapped under a deck, and a burning fence can carry flames directly to your exterior walls. These attachments create direct pathways for fire, bypassing many of the other hardening measures you’ve put in place, turning a manageable threat into a serious one.
Thinking about these structures as extensions of your home is a crucial mindset shift. Each one needs to be assessed for its potential to catch fire and spread it. By addressing the vulnerabilities of your decks, fences, and outbuildings, you complete your home’s defensive shield. It’s about eliminating those weak links in the chain of protection. Taking steps to harden these surrounding features ensures that a small fire on your property doesn't quickly become a catastrophe for your home. Let's break down how to secure these common weak points.
Protect Decks and Porches
Decks and porches are wonderful for enjoying the outdoors, but they are also one of the most significant vulnerabilities for a home in a wildfire. Often made of wood and elevated off the ground, they are prime targets for embers. Embers can get blown underneath the deck, igniting the dry leaves and debris that naturally collect there, or they can land on the surface and ignite the deck itself. The key is to treat your deck with the same level of attention as your roof or siding. This means removing potential fuel sources and strengthening the connection point where the deck meets the house, which is often the most critical point of failure.
Use Metal Flashing
One of the most effective ways to protect your home is to prevent flames from reaching your siding. If your deck is attached to your house, you should install metal flashing at the junction where the deck and the wall meet. This simple piece of non-combustible material creates a barrier that prevents embers from getting lodged in the gap and igniting your siding. It’s a small detail that provides a huge amount of protection by severing that direct connection point, ensuring a fire on your deck doesn't automatically become a fire on your house.
Clear and Enclose Under-Deck Areas
The space underneath your deck is a natural trap for flammable debris like dry leaves, pine needles, and grass. An ember landing in this pile of kindling can quickly start a fire that goes unnoticed until it’s burning through your deck boards. The best solution is to keep this area completely clean. For a more permanent fix, close off the space under your deck and porch with 1/8-inch wire mesh. This screen is fine enough to block embers and stop debris from blowing in, but it still allows for necessary airflow, preventing moisture buildup.
Address Attached Fences
A wooden fence connected directly to your house is like a wick for a candle. If the fence ignites anywhere along its length, the fire can travel straight to your home, easily reaching your siding and eaves. This is a common way homes are lost in wildfires, as the fence provides a continuous line of fuel that bypasses the defensible space you’ve worked so hard to create in your yard. Addressing this single vulnerability can dramatically increase your home’s chances of survival by creating a crucial break in the fire's path, stopping it before it can do any real damage.
Create a Noncombustible Break
To prevent a fence from leading fire to your home, you need to create a fuel break. The most effective way to do this is to replace the section of the fence that attaches to your house. By swapping out the first five to eight feet of your wooden fence with a noncombustible material, you create a barrier. A metal gate or a section of masonry or stone wall can effectively stop the fire's advance. This simple modification ensures that even if your main fence line burns, the fire will stop before it ever reaches your house.
Manage Other Structures on Your Property
Your home isn't the only structure at risk on your property. Sheds, gazebos, playhouses, and even RVs can become significant fuel sources if they ignite. When a secondary structure like a shed catches fire, it can produce a tremendous amount of radiant heat and shower your main house with embers, putting it at extreme risk. That’s why it’s so important to apply the same home hardening and defensible space principles to all the structures on your land, not just the one you live in. Managing their location and maintenance is a critical part of your overall wildfire resilience plan.
Maintain Safe Distances for Sheds and RVs
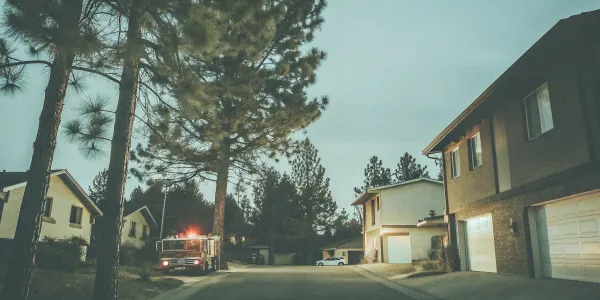
Distance is your friend when it comes to outbuildings. Any detached structures, including sheds and parked RVs, should be located at least 10 feet, and ideally 30 feet, away from your home. This separation helps ensure that if one structure catches fire, it won't easily spread to another. You should also create an "ember-resistant zone" immediately around these structures, just as you would for your house. Keep the area clear of flammable vegetation and debris to reduce the chance of ignition from wind-blown embers.
How to Assess Your Property's Wildfire Risk
Before you can create a solid home hardening plan, you need a clear picture of your property's specific vulnerabilities. A thorough risk assessment is your starting point—it helps you understand where your greatest threats lie so you can prioritize your efforts and budget effectively. Think of it as a diagnostic check-up for your home’s wildfire safety. By walking through your property with a critical eye, you can identify the exact areas that need attention, from the type of plants near your foundation to the materials on your roof. This process turns a big, overwhelming task into a series of manageable steps.
Start with Your Surroundings: Location and Slope
Your home’s physical location plays a huge role in its wildfire risk. Factors like the slope of your land, the direction of prevailing winds, and your area's fire history all contribute to your unique risk profile. Homes located on a steep slope or at the top of a ravine are often at greater risk because fire spreads uphill quickly. Since wildfires are becoming more intense, firefighters can't always save every home, making your personal preparedness critical. Start by understanding the geographical factors that affect your property. Knowing if you live in a region prone to high winds or frequent drought can help you make smarter decisions about both landscaping and structural upgrades.
What's Growing Nearby? A Look at Vegetation
The plants and trees around your home are one of the most significant factors in how a wildfire might behave on your property. This is where the concept of defensible space comes in. Defensible space is the buffer zone you create between your home and the surrounding vegetation to slow or stop a fire’s spread. Walk your property and look for potential fuel sources. Are there dead trees, dry leaves, or overgrown shrubs near your house? Do tree branches hang over your roof? Clearing this "fuel" is one of the most effective actions you can take. Creating this buffer gives firefighters a safer area to work in and dramatically increases your home's chance of survival.
Take a Closer Look at Your Home's Materials
The materials your home is built with can either resist embers or become fuel for a fire. A careful inspection can reveal your home’s weak points. Start with the roof—is it made of a fire-resistant material like asphalt shingles, metal, or tile, or is it something combustible like wood shake? Check your vents (attic, crawl space, dryer) to see if they are covered with a fine metal mesh to block embers. Look at your windows; multi-paned, tempered glass is much more resistant to breaking from heat than single-pane glass. Taking these home hardening steps, from your roof down to your foundation, is essential for creating a fire-resilient structure.
Get a Digital Assist with Risk Assessment Tools
While a visual inspection is a great start, it can be tough to catch everything or know which issues are most critical. This is where technology can help. Digital assessment tools can provide a more objective and comprehensive analysis of your property’s risk. For example, some apps, like FireSmart Canada’s Begins At Home, guide you through a detailed checklist to evaluate your home’s vulnerabilities. These tools use data to analyze your defensible space, building materials, and surrounding topography, giving you a clear, prioritized list of actionable recommendations. This data-driven approach helps you focus your resources on the upgrades that will make the biggest difference in protecting your home.
How to Plan Your Home Hardening Project
Tackling a home hardening project can feel like a huge undertaking, but a solid plan makes it manageable. Instead of trying to do everything at once, you can approach it strategically, focusing on what matters most and spreading the work and costs over time. By breaking the process down into clear, actionable steps, you can systematically improve your home’s resilience without feeling overwhelmed. This approach helps you make steady progress, ensuring each upgrade contributes to a safer, more defensible property. Let’s walk through how to create a plan that fits your home, your budget, and your timeline.
Where Should You Start? Prioritizing for Impact
You don’t need to overhaul your entire property overnight to make a difference. The key is to focus on the most vulnerable areas first. Wildfire defense is all about creating a "layered defense," where multiple improvements work together to protect your home. Start with the upgrades that offer the biggest return on safety. This often includes cleaning your roof and gutters, installing ember-resistant vents, and clearing flammable materials from the first five feet around your house. These initial steps are often low-cost and can dramatically reduce the chances of ignition from flying embers, which are a primary threat during a wildfire.
Should You DIY or Hire a Professional?
Many home hardening tasks are perfect for a weekend project. Clearing vegetation, cleaning gutters, and sealing gaps around your home are all effective DIY jobs. However, for larger or more technical projects, it’s wise to call in a professional. Installing a new fire-rated roof, replacing windows with tempered glass, or upgrading your siding requires specialized skills and equipment. A qualified contractor ensures the job is done correctly and meets local building codes. For anything involving your home's structure, it's best to hire a professional who can identify potential issues and guarantee the work is done safely and effectively.
Break It Down: Creating a Step-by-Step Plan
Unless you’re building a new home, hardening your property will likely be a multi-step process. Creating a phased plan helps you manage costs and logistics. You can break down large projects into smaller, more manageable stages. For example, you might dedicate this year’s budget to creating excellent defensible space and installing new vents. Next year, you could focus on upgrading your windows and doors. By mapping out a timeline, you can make consistent improvements over several years. This approach turns a daunting goal into a series of achievable milestones, making the entire process much less stressful.
Understand the Real Costs vs. Common Myths
There’s a common misconception that building a wildfire-resistant home is prohibitively expensive. However, research shows that constructing a new home to wildfire-resistant standards costs about the same as a typical home. When it comes to retrofitting an existing property, costs can vary widely based on the project's scope. Simple upgrades like installing ember-resistant vents might only cost a few hundred dollars. More extensive renovations, like replacing your roof or siding, can be a significant investment, but they also provide the highest level of protection. Knowing the realistic costs of fireproofing helps you budget effectively and avoid surprises.
Understanding Home Hardening Laws and Resources
You don’t have to figure all of this out on your own. As wildfire risk becomes a more pressing issue, state and local governments are stepping in with new regulations to create safer communities. At the same time, fire safety organizations have developed a wealth of free resources to guide you through the process. Knowing where to find this information can help you make informed decisions, ensure your projects meet legal standards, and connect you with expert advice. It’s about turning a complex challenge into a clear, actionable plan for protecting your home.
Know the Local Laws and Regulations
Wildfire preparedness is increasingly a matter of public policy, which means homeowners in high-risk areas need to be aware of local and state laws. These regulations are designed to establish a baseline of safety for entire communities, ensuring that new construction and, in some cases, existing homes meet modern fire-resistance standards. Staying informed about the rules in your area is crucial, especially if you are planning to build, renovate, or sell your property. These laws can influence everything from the types of building materials you’re allowed to use to the disclosures you must provide during a real estate transaction, making compliance an essential part of your home hardening strategy.
California Assembly Bill 38 (AB 38)
If you live in California, one of the most important regulations to understand is Assembly Bill 38, also known as the Home Hardening Law. This law applies to homes in high or very high fire hazard severity zones that are sold after July 1, 2021. It requires sellers to provide buyers with documentation stating which fire hardening features the home has, such as a Class A roof or ember-resistant vents. The goal of AB 38 is to increase transparency and encourage homeowners to make critical safety upgrades. It creates a clear record of a home’s wildfire resilience, which is valuable information for buyers, lenders, and insurance companies alike.
Find Helpful Resources and Guides
While laws set the requirements, a number of organizations offer incredible resources to help you meet and exceed them. You can find everything from simple checklists to in-depth guides, all designed to make home hardening more accessible. These tools are often created by fire science experts and are available for free online. They can help you perform a self-assessment of your property, learn about the most effective upgrades, and find fire-resistant landscaping ideas. Tapping into this expert guidance can give you the confidence to build a solid plan and prioritize the projects that will provide the most protection for your home and family.
CAL FIRE Self-Assessment
A great place to start is with CAL FIRE’s online self-assessment tool. In less than 10 minutes, you can walk through a simple questionnaire that evaluates your home’s current level of wildfire readiness. The assessment covers key areas like your roof, vents, siding, and the defensible space around your property. Once you’re done, it provides a custom report that highlights your vulnerabilities and gives you a prioritized list of recommendations. This quick online test is an easy, no-cost way to get a clear snapshot of where you stand and identify the most impactful first steps you can take to improve your home’s defenses.
Expert Guidance from Firewise and Readyforwildfire.org
For more comprehensive information, national programs like Firewise USA® and state-level resources like Readyforwildfire.org are invaluable. These sites offer detailed guides, research, and visual aids that explain the science behind home ignition and effective hardening strategies. They reinforce the idea that home hardening is a strategic, long-term project that pays off over time. By creating a phased plan, you can manage expenses while knowing that each upgrade contributes to lowering your insurance premiums, increasing your property value, and providing invaluable peace of mind. These resources empower you to make smart investments in your home's long-term safety and resilience.
Is Home Hardening Worth It? The Long-Term Payoff
Making the decision to harden your home is a significant one, and it’s natural to focus on the immediate costs and labor involved. But it’s crucial to see these actions not as expenses, but as a powerful investment in your future. The payoff extends far beyond the next fire season, creating a ripple effect that benefits your finances, your property's longevity, and your overall peace of mind. Think of it this way: every home hardening project you complete adds another layer of security and value to your property.
By taking proactive steps to make your home more wildfire-resistant, you are fundamentally changing its relationship with the surrounding environment. You're building a more resilient, valuable, and secure asset that stands strong in a fire-adapted landscape. This shift from a reactive stance of anxiety to a proactive one of preparedness is where the true value lies. Below, we’ll explore the tangible, long-term benefits that make home hardening one of the smartest decisions a homeowner in a wildfire-prone area can make. From lower insurance bills to higher property values and reduced maintenance, the advantages are clear, compelling, and lasting.
Save Money on Homeowners Insurance
Insurance in high-risk areas can be a major headache, with rising costs and even non-renewals becoming common. Hardening your home directly addresses the core concern of insurers: risk. By making your property a lower risk, you become a more attractive client. Many insurance companies recognize and reward these efforts. For example, some programs provide a certification letter to homeowners who complete specific improvements, which can lead to meaningful discounts on premiums. Taking these steps not only protects your home but can also make your insurance more affordable and accessible, turning a major source of stress into a manageable expense.
Add Real Value to Your Property
There's a common myth that building a wildfire-resistant home is excessively expensive. In reality, investing in home hardening can directly increase your property's market value. As more buyers become aware of wildfire risks, a hardened home is a significant selling point, signaling safety, durability, and lower long-term costs. Many fire-resistant materials, like fiber-cement siding, are also more durable and require less upkeep than traditional options. This means you’re not just adding a safety feature; you’re making a smart upgrade that appeals to savvy buyers and can command a higher price when it’s time to sell. It’s an investment that protects your home now and pays you back later.
Spend Less on Future Maintenance
Home hardening and long-term savings go hand in hand. The materials used to make your home more fire-resistant are often tougher and more durable than their conventional counterparts. Think about it: materials designed to withstand extreme heat are also built to stand up to harsh weather, pests, and general wear and tear. For instance, choosing wildfire-resistant fiber-cement siding over traditional wood can actually reduce exterior wall costs and eliminate the need for frequent repainting or sealing. This means you’ll spend less time and money on upkeep over the years, allowing your initial investment to pay for itself through reduced maintenance expenses.
The Ultimate Benefit: Lasting Peace of Mind
Perhaps the most valuable benefit of home hardening isn't financial at all—it's the profound sense of security you get from knowing you’ve done what you can to protect your home and family. Living with the constant threat of wildfire is stressful. Taking concrete action to mitigate that risk can lift a heavy weight off your shoulders. Every improvement, from clearing defensible space to installing ember-resistant vents, helps lower the risk of your home igniting during a wildfire. This peace of mind allows you to enjoy your home more fully and worry less when fire season arrives. It’s an investment in your well-being that is truly priceless.
Related Articles
- A Guide to Homeowners Insurance in CA High Risk Fire Areas
- The Real Cost to Fire Proof a House in 2025
- How to Get a Free Wildfire Risk Assessment
- How Is a Wildfire Risk Score Calculated? A Guide
Frequently Asked Questions
What’s the difference between home hardening and defensible space? Think of it this way: home hardening focuses on the house itself—its structure and materials. It’s about upgrading things like your roof, siding, and vents to make them resistant to embers and heat. Defensible space is all about managing the area around your house. It involves clearing vegetation and creating a buffer zone to slow a fire down before it ever reaches your home. They are two separate concepts, but they work together as a team to give your property the best possible protection.
I have a limited budget. Where should I start? You don't have to do everything at once to make a real impact. Start with the most effective, low-cost projects. Your first priority should be creating an ember-resistant zone in the first five feet around your home's foundation. After that, focus on cleaning your roof and gutters of all flammable debris. Finally, cover all your vents with 1/8-inch metal mesh screening. These three actions directly address the primary way homes ignite—from flying embers—and give you the most safety for your investment.
Will hardening my home guarantee it will survive a wildfire? While no home can be completely fireproof, home hardening dramatically improves its odds of survival. The goal is to reduce risk, not eliminate it entirely. By systematically removing the weak points where embers can ignite a fire, you give your home a strong fighting chance, even if firefighters can't get to your property. It's about stacking the odds in your favor and creating a structure that is far more likely to withstand a wildfire than an unprepared one.
How can I prove to my insurance company that I've hardened my home? Documentation is key. Keep detailed records of all the work you do, including receipts for materials and invoices from contractors. Take before-and-after photos of your projects, whether it’s a new fire-rated roof or a cleared defensible space zone. Some states or local fire departments offer official certification programs. When you speak with your insurance agent, present this file as evidence of your risk-reduction efforts. This shows them you are a proactive homeowner, which can help you secure coverage and potentially earn discounts.
Do I have to make my yard look barren to create defensible space? Not at all. A fire-safe landscape can still be lush and beautiful. The goal isn't to clear-cut your property but to be strategic about what you plant and where you plant it. It’s about creating separation between trees and shrubs to keep fire from spreading easily. You can choose high-moisture, low-resin plants and use features like gravel paths and stone patios as attractive fuel breaks. A well-designed, fire-resistant yard is both safe and stylish.