Your Guide to Passing an Insurance Fire Inspection
Get ready for your insurance fire inspection with this practical checklist. Learn what inspectors look for and how to prepare your home for success.
That letter from your insurance provider just landed: an insurance fire inspection is on the calendar. Don't panic. You have more control over the outcome than you might realize. A successful inspection comes down to proactive preparation. By understanding what inspectors prioritize—from the state of your roof to the placement of smoke alarms—you can fix potential issues before they ever step on your property. This guide is your practical game plan. We'll give you a step-by-step checklist to help you prepare and pass with confidence.
Key Takeaways
- Conduct your own pre-inspection: Walk through your property with a critical eye before the official visit. Addressing small issues like cleaning your gutters or testing smoke alarms shows the inspector you’re a proactive homeowner and makes the entire process smoother.
- Create layers of defense from the inside out: A successful inspection requires a holistic approach. Clear defensible space outside to protect your home from external threats, and manage interior risks like your electrical system and flammable storage to prevent a fire from starting within.
- Use the report as your long-term safety plan: The inspection isn't just a test; it's a professional assessment of your home's vulnerabilities. Whether you pass or receive a list of required fixes, use the findings to guide your ongoing maintenance and keep your home safe year-round.
What Is a Home Insurance Fire Inspection?
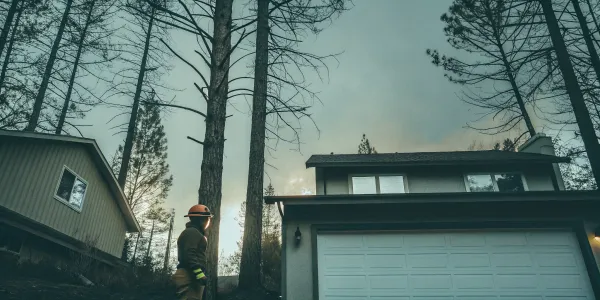
A home insurance fire inspection is a routine assessment that helps your insurance company understand the potential risks associated with your property. Think of it as a check-up for your home. An inspector, working on behalf of the insurer, evaluates your property to determine how much it would cost to rebuild and to identify any potential fire hazards. This process is especially common if you live in an area with a high risk of wildfires, as insurers need to be confident that a home is reasonably protected.
The inspector looks at everything from your home’s construction materials to the state of your electrical wiring. For those of us in wildfire-prone regions, they pay special attention to the exterior, assessing things like roofing materials, vents, and the defensible space around your home. The final report helps the insurance company confirm your home meets their safety standards and allows them to set a fair premium for your policy. It’s a standard part of the process that ensures both you and your insurer have a clear picture of the property’s condition, and it's your first step toward proving your home is insurable.
Why Does My Insurer Want a Fire Inspection?
Insurance companies require fire inspections to get an accurate understanding of the risk they’re taking on by insuring your home. It’s their way of verifying the details you provided on your application and making sure there aren’t any hidden issues that could lead to a major claim. An inspection is particularly likely if you have an older home, if you’re switching insurance companies, or if your property hasn’t been inspected in the last decade. For homeowners in high-risk fire zones, these inspections are becoming a crucial step for securing and maintaining coverage. It’s a practical measure to manage risk on their end.
When Should You Expect an Inspection?
You can typically expect a home insurance inspection to happen within the first few weeks after your new policy begins. Your insurance provider won’t just show up unannounced; they will contact you to schedule a convenient time for the inspector to visit. This gives you a heads-up and allows you to prepare your property without feeling rushed. The process is usually quick and straightforward, often taking less than an hour to complete, though it can vary depending on the size and complexity of your property. Knowing when to expect it can help you feel more prepared and less stressed about the visit.
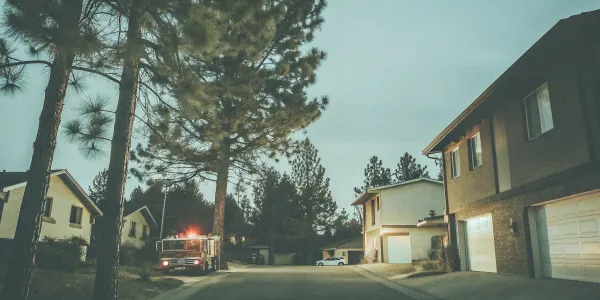
Scheduled Visits vs. Drive-By Inspections
Inspections generally come in two flavors: a scheduled visit or a drive-by assessment. A scheduled visit is the more thorough of the two. Your insurance provider will contact you to arrange a specific date and time for an inspector to come to your home, which is great because it gives you a clear deadline to prepare. During this in-person visit, the inspector will look at both the interior and exterior of your property. They’ll check everything from your electrical systems and smoke detectors inside to your roof and the condition of your defensible space outside. It’s a comprehensive check-up, but having that advance notice means you can tackle your to-do list without feeling caught off guard.
A drive-by inspection, on the other hand, is much less formal. Just as it sounds, an inspector will simply view your property from the street or driveway to evaluate its exterior condition and spot any obvious risks, like an old roof or overgrown vegetation near the house. You might not even know it’s happening. While this is less intrusive, it also means the assessment is based only on what’s visible from a distance. A quick glance might not capture all the proactive work you’ve done to maintain your property, especially the finer details of your defensible space. Knowing which type of inspection to expect helps you focus your preparation where it matters most.
What Will the Inspector Look For?
During an inspection, an inspector will assess both the interior and exterior of your home. Inside, they’ll look at your electrical systems, plumbing, heating and cooling (HVAC) units, and check for functional safety devices like smoke alarms and carbon monoxide detectors. Outside, the focus shifts to structural integrity and environmental hazards. They’ll examine your roof, gutters, and siding. In wildfire-prone areas, they will heavily scrutinize your defensible space, looking at vegetation clearance, flammable materials near the house, and overall property maintenance.
Beyond Fire: The Full Scope of an Inspection
It’s easy to assume a fire inspection is only about wildfire risk, but the inspector is really conducting a full health check-up on your property. They’re trained to spot a wide range of hazards that could lead to a claim, looking at everything from the age of your roof to the condition of your electrical systems. While defensible space is a major focus in high-risk areas, the assessment also covers interior vulnerabilities. They’ll note potential issues like overloaded circuits, improperly stored flammable materials, or a furnace that hasn’t been serviced. The goal is to build a complete risk profile of your home, ensuring the property is as safe from a fire starting inside as it is from one approaching outside.
Potential Outcomes: More Than Just Pass or Fail
Try not to think of the inspection as a test you can fail. Instead, view it as a professional consultation that provides a clear path forward. After the visit, you’ll typically receive a report with one of a few outcomes. You might get a clean bill of health, meaning your policy continues without issue. More commonly, you may receive a list of required repairs or changes to be completed within a specific timeframe, like 30 or 60 days. In rare cases where the risk is too high, the insurer might issue a notice of non-renewal. Whatever the result, the report is your roadmap. It gives you specific, actionable items to improve your home’s safety and strengthen its insurability for the long term.
Fire Inspection Myths, Busted
One of the biggest myths about home insurance is that a standard policy provides blanket coverage for any and all disasters. In reality, policies have specific limits and exclusions, and an inspection helps determine if your home qualifies for the coverage you need. Another common misconception is that the insurance company will handle everything automatically after a fire. The truth is, your policy requires you to maintain the home in good condition. An inspection verifies that you’re holding up your end of the agreement, which is essential for ensuring your claims are approved without issue.
Prep Your Fire Safety Equipment
Before an inspector ever steps through your door, you can set yourself up for success by making sure your safety equipment is in place and working correctly. Think of these items as your home’s first line of defense. An inspector will see them the same way, so having everything in order shows you’re serious about fire safety. This isn’t just about checking boxes; it’s about ensuring the systems you rely on will actually function when you need them most.
Taking the time to review your equipment now will make the inspection process smoother and, more importantly, will give you genuine peace of mind. Let’s walk through the key pieces of equipment an inspector will be looking for.
Test Your Smoke and Carbon Monoxide Detectors
This is one of the easiest and most critical checks you can perform. An inspector will want to see smoke alarms on every level of your home, including the basement. They should also be placed both inside and outside all sleeping areas. Don’t forget about carbon monoxide (CO) detectors, which are equally important for safety.
Get into the habit of testing your alarms every month—it only takes a minute. A simple press of the test button is all you need. If you have battery-operated units, make sure you’re swapping in fresh batteries at least once a year. For a comprehensive guide, you can use a fire safety checklist to confirm you have all your bases covered.
Are Your Fire Extinguishers in the Right Place?
Having fire extinguishers is a must, but their placement is just as important. An inspector will look for extinguishers in high-risk areas like the kitchen, garage, and workshop. They should be easily accessible, not buried in the back of a cabinet or closet. Make sure everyone in your household knows where they are and how to use them.
Check the pressure gauge on each extinguisher monthly to ensure it’s in the green, operable range. Most home extinguishers are multi-purpose (labeled ABC), which is what you’ll want for common household fires. Having them ready is a key part of a solid fire safety and prevention plan.
Test Your Sprinkler and Alarm Systems
If your home is equipped with a fire sprinkler system or a monitored alarm, an inspector will want to see that it’s been properly maintained. These systems aren’t just “set it and forget it.” Check your user manual for instructions on how to perform routine tests.
For more complex systems, it’s a good idea to have them professionally serviced annually. Keep the service records handy, as the inspector may ask to see them. A proactive approach is essential for maintaining ongoing fire safety and demonstrating to your insurer that you’re committed to mitigating risk.
Get Your Safety Paperwork in Order
Speaking of records, get all your safety-related paperwork in order before the inspection. This includes maintenance receipts for your HVAC system, chimney sweeping, and any fire safety systems like sprinklers or alarms. Having this documentation organized in a single folder makes a great impression.
This process shows the inspector that you’re a responsible homeowner who actively maintains the property. It also plays a significant role in your home insurance inspection, as it provides clear evidence of your home’s condition and your commitment to safety, which can influence your coverage and premiums.
Set Up a Simple Maintenance Schedule
The best way to stay on top of everything is to create a simple maintenance schedule. You can set calendar reminders on your phone or use a simple spreadsheet. Schedule monthly tasks like testing smoke alarms and checking extinguisher gauges. Add semi-annual tasks like cleaning your dryer vent and annual reminders for professional servicing of your furnace and chimney.
Regular assessments help you identify potential hazards before they become serious problems. A consistent schedule ensures you’re always prepared for an inspection and helps you ensure compliance with fire safety standards year-round, not just when an inspector is on the way.
Getting Your Home's Interior Inspection-Ready
While creating defensible space outside is critical, what’s inside your home matters just as much to an inspector. They need to see that you’re taking a comprehensive approach to fire safety. An inspector will look at your home’s core systems and overall living conditions to identify potential fire starters. Think of it this way: the exterior preparations help protect your home from an approaching wildfire, while the interior preparations help prevent a fire from starting in the first place.
Taking the time to walk through your home’s interior can reveal hidden risks you might have overlooked. From your electrical panel to your storage habits, each detail contributes to your home's overall safety profile. Addressing these areas not only prepares you for a successful inspection but also gives you invaluable peace of mind. Let’s break down the key areas an inspector will focus on inside your home.
Check for Electrical Hazards
Your home's electrical system is a primary focus during any fire inspection, especially in homes over 20 years old. Faulty wiring is a leading cause of residential fires, so an inspector will carefully check your electrical panel, outlets, and visible wiring. Before they arrive, take a look yourself. Are any outlets warm to the touch, discolored, or overloaded with plugs? Do you see any frayed or damaged cords?
If your home has an older panel or if you frequently experience tripped breakers, it might be time for a professional evaluation. A licensed electrician can perform a thorough electrical safety inspection to identify and fix any issues, ensuring your system is up to code and safe for your family. This is a proactive step that shows an insurer you’re serious about mitigating risk.
Inspect Your Furnace and HVAC
Your heating, ventilation, and air conditioning (HVAC) systems work hard to keep you comfortable, but they can become serious fire hazards if not properly maintained. An inspector will check that your furnace, water heater, and central air systems are in good working order and have adequate clearance. A key fire safety rule is to keep all combustible items at least three feet away from any heating equipment.
Schedule regular professional maintenance for your HVAC system to keep it running safely and efficiently. A technician can clean components, check for leaks, and ensure all connections are secure. Don't forget your chimney and fireplace—if you have them, an annual cleaning and inspection by a certified chimney sweep is essential to prevent dangerous creosote buildup.
Where to Safely Store Flammable Items
Many common household products—from aerosol cans and cleaning supplies to paint thinners and gasoline—are highly flammable. An inspector will want to see that you’re storing these materials responsibly. The best practice is to keep them in their original containers and away from any heat sources like furnaces, water heaters, or space heaters.
Ideally, store flammable liquids in a detached garage or shed, not inside your home. If you must keep them indoors, make sure the area is cool and well-ventilated. Never store propane tanks, even small ones for camping, inside your house or garage. Proper hazardous material storage is a simple but critical step in preventing accidental fires and is a major green flag for any inspector.
Map Out Your Emergency Escape Routes
While an inspector might not ask you to demonstrate your escape plan, they will look for clear and accessible exit routes. Every room, especially bedrooms, should have at least two ways out—typically a door and a window. Walk through your home and make sure all doors and windows open easily and aren't blocked by furniture, storage boxes, or other items.
Create a home evacuation plan and practice it with everyone in your household. Ensure hallways and stairways are always kept clear. This shows an inspector that you prioritize safety and are prepared for an emergency. If you have security bars on your windows, they must have a quick-release mechanism from the inside to allow for a fast escape.
Spot and Fix Hidden Fire Hazards
Some of the most common fire risks are the ones we forget about. Take some time to conduct your own risk assessment and look for hidden hazards. One of the biggest culprits is dryer lint. Clean the lint trap after every single load of laundry, and have the dryer vent pipe professionally cleaned at least once a year to prevent a dangerous buildup.
Also, check for dust accumulation on electronics, vents, and behind appliances, as it can ignite. Make sure extension cords are not running under rugs or through doorways, and never use them as a permanent wiring solution. By spotting and fixing these small issues, you demonstrate a proactive approach to fire safety that inspectors appreciate.
Declutter Pathways and Exits
Clutter is more than just an eyesore; it’s a significant fire hazard. Piles of paper, clothing, or boxes can provide fuel for a fire, helping it spread rapidly through your home. Clutter can also block your escape routes and prevent firefighters from moving quickly and safely through your house in an emergency.
Before your inspection, take time to declutter, especially in hallways, stairways, and around doorways. Pay special attention to storage areas like basements, attics, and garages, as these are common places for clutter to accumulate. An organized, tidy home signals to an inspector that you are a responsible homeowner who maintains a safe living environment.
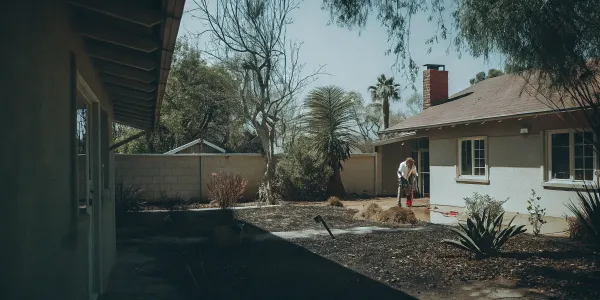
Prepping Your Home's Exterior for Inspection
When preparing for a fire inspection, it’s easy to focus on the inside of your house, but inspectors will spend just as much time examining the outside. Your home’s exterior and the area immediately surrounding it are your first line of defense against fire, especially wildfire. An inspector will look for potential hazards that could allow a fire to reach your home. This includes everything from overgrown vegetation and clogged gutters to the materials your home is built with. Taking the time to walk your property and address these exterior vulnerabilities is one of the most important things you can do to protect your home and pass your inspection.
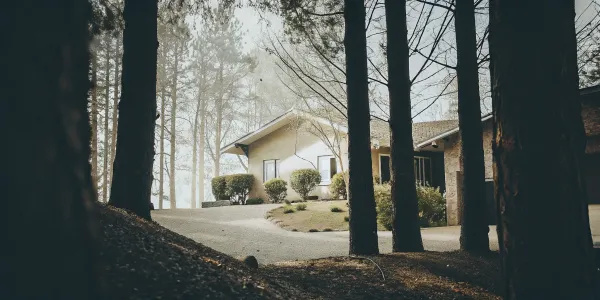
Clear the Area Around Your Home (Defensible Space)
Defensible space is the buffer you create between your home and the grass, trees, and wildland around it. This space is essential for slowing or stopping the spread of wildfire and protecting your house from direct flames and radiant heat. Start by removing dead plants, weeds, and dry leaves within 30 feet of your home. You’ll also want to trim tree branches so the lowest limbs are 6 to 10 feet from the ground. A wildfire risk assessment can help you identify specific areas for improvement. Creating these fuel breaks gives firefighters a safer area to work in and significantly increases your home’s chance of survival.
Using Digital Tools to Assess Your Defensible Space
Trying to eyeball your defensible space can feel a bit like guesswork. Is that oak tree too close to the roof? Is the shrubbery near the foundation a fire risk? Instead of wondering, you can use digital tools to get a clear, objective picture of your property's readiness. Many of these platforms use AI-driven analysis to scan the vegetation and structures around your home, giving you a data-backed report on your specific vulnerabilities. Our own Defensible Space Score, for example, provides a detailed assessment and a list of actionable recommendations tailored to your property. This takes the uncertainty out of the process and gives you a concrete plan to follow before an inspector ever arrives, helping you address the most critical issues first.
Clean Your Roof and Gutters
Your roof is one of the most vulnerable parts of your home during a wildfire because it can catch flying embers. That’s why it’s critical to keep your roof and gutters clean. Regularly remove pine needles, leaves, and any other debris that has collected, as this material can easily ignite. While you’re up there, inspect your roof for any damage or gaps where embers could get inside. If you’re considering a new roof, look into fire-resistant materials like asphalt shingles, metal, or slate. A clean and well-maintained roof is a simple but powerful step in fire prevention that inspectors will always check.
Can Emergency Services See Your Address?
In an emergency, every second counts. Firefighters and other first responders need to be able to find your home quickly, day or night. Make sure your address numbers are clearly visible from the street. They should be at least four inches tall and made of a non-combustible, reflective material that contrasts with the color of your house. Check that they aren’t obscured by trees, bushes, or decorations. Some local fire codes have specific rules for address visibility, so it’s always a good idea to confirm your local requirements. This small detail can make a huge difference when help is on the way.
Check for Outdoor Fire Hazards
Your yard can contain hidden fire risks that an inspector will spot right away. Start by moving any woodpiles at least 30 feet away from your house and other structures. The same goes for propane tanks for your grill; they should never be stored indoors or right next to the house. If you have a fire pit, make sure it’s on a non-combustible surface and far from overhanging branches or your home’s siding. Finally, keep the areas under your deck and in outdoor storage sheds tidy and free of flammable clutter like oily rags, dry leaves, or leftover building materials.
Look for Structural Issues
The physical structure of your home plays a huge role in its ability to resist fire. An inspector will look for vulnerabilities where embers could enter or ignite siding. Cover all attic, eave, and foundation vents with 1/8-inch metal mesh to block flying embers. Check your siding for any gaps or damage, and if possible, maintain a six-inch clearance between the ground and the bottom of your siding. Double-paned windows are also a major plus, as they provide better insulation against intense heat. These steps are part of a process called home hardening, which strengthens your home against wildfire threats.
Understanding Official Standards and Finding Help
Preparing your home for a fire inspection can feel like a big project, but you don’t have to figure it all out on your own. There are established safety standards and local experts ready to help guide you. Tapping into these resources not only ensures you’re meeting official requirements but also connects you with a community of people who are just as invested in fire safety as you are. Knowing the official guidelines and who to call for help can turn uncertainty into a clear, manageable plan. This approach gives you confidence that the changes you’re making are the right ones, both for passing your inspection and for genuinely protecting your home.
Following National Fire Protection Association (NFPA) Guidelines
When it comes to fire safety, the National Fire Protection Association (NFPA) sets the standard. Insurance companies and local fire departments rely on these guidelines to assess risk, and your inspector will expect your property to meet them. It’s important to follow state rules and NFPA 25 standards for fire safety, as neglecting them can have serious consequences. For example, if your home has a fire sprinkler system, failing to keep up with inspections could make you responsible for damages in a fire, and your insurer might refuse to cover the costs. Familiarizing yourself with the relevant NFPA codes for residential properties shows your inspector that you’re proactive and knowledgeable about your responsibilities as a homeowner.
Connecting with Local Fire Departments and Resources
Your local fire department is one of your best resources. They have firsthand knowledge of the specific fire risks and regulations in your area, which can sometimes be stricter than state or national codes. Don’t hesitate to reach out to them or your local Fire Safe Council for advice. These organizations can help you understand local rules and may offer programs or consultations to help you prepare your property. In some cases, they can even inspect and certify your defensible space efforts, providing valuable documentation to share with your insurance company. Building a relationship with your local fire safety experts is a powerful step toward creating a truly fire-resilient home.
Your Final Pre-Inspection Checklist
An upcoming inspection can feel daunting, but a little preparation goes a long way. Think of this as an opportunity to give your home a thorough safety check-up—not just for the inspector, but for your own peace of mind. Walking through your property with a critical eye helps you spot potential issues before they become major problems. By addressing common red flags ahead of time, you show the inspector that you’re a proactive and responsible homeowner.
This checklist is designed to guide you through a simple, effective self-inspection. We’ll cover everything from room-by-room reviews to the often-overlooked spots that inspectors always check. Taking these steps can make the official inspection a much smoother process and helps ensure you get the best possible outcome for your home and your insurance policy. Let’s get your home ready.
Do a Quick Room-by-Room Walkthrough
Start with a systematic walkthrough of your home. Grab a notepad and begin in one room, carefully examining it before moving to the next. Look at the walls and ceilings for any significant cracks or signs of water damage, like stains or peeling paint. Check the seals around windows and doors to ensure there are no gaps where embers could potentially enter. Test each window to make sure it opens and closes properly, as they are critical secondary escape routes. This methodical approach ensures you don't miss small details that could point to larger issues. A thorough home maintenance checklist can be a great guide during your review.
Double-Check These Critical Safety Items
Your home’s safety systems are a top priority for any inspector. First, test every smoke and carbon monoxide detector to confirm they are working. The National Fire Protection Association recommends placing smoke alarms inside each bedroom, outside each sleeping area, and on every level of the home. Next, check your fire extinguishers. Make sure the pressure gauge is in the green zone and that they are easily accessible, not buried in the back of a closet. Finally, take a look at your home’s core systems, including the electrical panel, water heater, and plumbing. An inspector will pay close attention to these, especially in older homes, so it’s good to know where they are and be aware of any existing issues.
Have Your Documents Ready
Having your documents in order demonstrates diligence and can help answer an inspector’s questions quickly. Gather any paperwork related to major home improvements or repairs, such as a new roof, updated electrical wiring, or a recently serviced HVAC system. If you have records of past inspections or chimney cleanings, keep those handy as well. After the inspection is complete, you will receive a copy of the report detailing the findings. Understanding the report is key, as it will outline one of three outcomes: you pass, you have issues that need to be addressed, or you fail and require a follow-up inspection after making mandatory repairs.
Check These Commonly Overlooked Spots
It’s easy to focus on the main living areas, but inspectors will check every part of your property. Pay special attention to the basement, attic, and crawl spaces. In the basement, look for foundation cracks, evidence of water leaks, or mold. In the attic, check for proper ventilation, signs of pests, and any structural concerns. These less-frequented areas often house your home’s essential systems, so it’s a good time to give your HVAC, plumbing, and electrical systems another look. Fixing any known problems in these spots before the inspection can prevent them from becoming sticking points in your report.
How to Do Your Own Mini-Inspection
The single most effective thing you can do to prepare is to fix any problems you find during your self-check before the inspector arrives. Addressing a leaky faucet, replacing a cracked windowpane, or securing a loose handrail shows good faith and responsible ownership. This proactive approach can help you pass the inspection with flying colors and may even contribute to more favorable insurance terms. Think of your self-inspection as a dress rehearsal. By identifying and resolving issues beforehand, you’re not just preparing for a test—you’re making a direct investment in your home’s safety and long-term resilience.
The Inspection Is Over. Now What?
The inspector has packed up their clipboard and left, but your work might just be starting. Getting the report is the next step, and it will outline exactly where your property stands. Whether you passed with flying colors or have a few things to address, think of the inspection report as your personalized roadmap to a safer, more secure home. It’s a tool to help you protect your property and maintain your insurance coverage. Let’s walk through how to handle the results and what comes next.
How to Make Sense of Your Inspection Report
Once you receive the report, you’ll find one of three outcomes. A “pass” means you’re all set, and your insurance will likely continue without any changes. If the report lists required fixes, it means the inspector found some issues that need your attention. You’ll typically be given a deadline to complete the repairs and provide proof. The third outcome is a “fail,” which can happen if major hazards are found. This could lead your insurer to non-renew or even cancel your policy. Understanding your specific home insurance inspection results is the first step toward taking effective action.
Make a Plan to Address Any Issues
If your report includes a list of required improvements, don’t panic—but do act quickly. Your insurer will give you a specific timeframe to get the work done, and meeting that deadline is crucial to keeping your policy active. Start by making a clear, prioritized list of the required fixes. Figure out which tasks you can handle yourself and which ones will require a professional. If you’re feeling overwhelmed, tackle the most critical safety issues first. Creating a simple action plan will help you manage the repairs efficiently and ensure everything is completed on time.
Tackle the Required Repairs
Now it’s time to get to work. Inspectors look for anything that could increase fire risk, so your list might include tasks like clearing flammable debris from your roof and gutters, repairing cracks in your foundation, or addressing faulty wiring. You may also need to manage vegetation to create more defensible space around your home. While you can handle some maintenance yourself, it’s often best to hire a licensed professional for electrical, plumbing, or structural repairs. Document everything you do with photos and receipts, as you’ll need to submit this as proof of completion to your insurer.
What If You Disagree with the Required Repairs?
It can be frustrating to receive an inspection report that lists required repairs you believe are unnecessary, too expensive, or based on an inaccurate assessment. Before you feel discouraged, know that you have options. The inspector’s report isn’t always the final word. You have the right to ask questions, present your own evidence, and explore different paths forward. This is your home, and you are your own best advocate. Understanding your rights and the resources available to you is the first step in finding a resolution that feels fair and keeps your home protected.
Your Right to Negotiate or Shop for a New Policy
Your first step should be to open a line of communication with your insurance agent or provider. Calmly explain which repairs you disagree with and why. Sometimes, a simple conversation can clear up a misunderstanding. If you’ve recently completed work on your property or have a professional opinion that contradicts the inspector’s findings, share that documentation. If negotiations don’t lead to a satisfactory outcome, remember that you are not locked in. You always have the right to shop for a new policy from a different carrier who may have different standards or view your property’s risk profile more favorably.
How to File a Complaint with Your State
If you believe your insurer is acting unfairly, not adhering to regulations, or refusing to consider reasonable evidence, you have a formal path for recourse. Every state has an insurance department or commission that oversees the industry and protects consumers. You can file a complaint with your state’s agency, which will then investigate the issue on your behalf. This process holds insurers accountable and ensures your rights as a policyholder are protected. Be sure to document all communication with your insurer, as this will be valuable evidence for your case.
Understanding Different Coverage Levels
It’s a common myth that a standard home insurance policy covers every possible disaster. In reality, every policy has specific limits, exclusions, and conditions. Understanding the fine print of your coverage is crucial when discussing required repairs with your insurer. Your policy is a contract that outlines your responsibilities as well as the insurer’s. Reviewing it can help you understand why certain repairs are being mandated and give you a stronger foundation for your negotiations. Knowing exactly what your coverage entails helps you have a more informed and effective conversation about your home’s insurability.
Understanding the Consequences of Non-Compliance
While it’s important to know your rights if you disagree with an inspection, it’s equally important to understand the potential consequences of not completing required repairs. Your insurance policy is a contract, and it includes an obligation for you to maintain your property and mitigate risks. Ignoring a list of mandatory fixes can have serious repercussions that go beyond just losing your current policy. It can affect your ability to get coverage in the future and, most importantly, leave you financially vulnerable in the event of a fire.
Fines and Legal Penalties
Homeowners policies come with what’s known as an affirmative maintenance obligation, which simply means you’ve agreed to keep your property in good, safe condition. When an insurer requires repairs, they are enforcing that part of your agreement. While it’s not the most common outcome, failing to comply with mandatory safety repairs could, in some situations, lead to penalties. This is especially true if your property is subject to local fire codes or ordinances. Non-compliance could be seen as a breach of your policy agreement, and it’s a risk that’s better to avoid by addressing the required fixes.
Personal Financial Liability
The most significant consequence of not making required repairs is the potential for massive out-of-pocket costs. If you fail to fix a known hazard and a fire occurs, your insurer could argue that your negligence contributed to the loss. This could lead them to deny your claim, leaving you personally responsible for all repair and rebuilding costs. For example, if your policy includes replacement cost coverage, that benefit often depends on you having maintained the property. By not completing the repairs, you risk forfeiting the very financial protection you’ve been paying for.
Getting Ready for a Re-Inspection
After you’ve completed the required repairs, your insurance company will likely schedule a follow-up inspection to verify the work. This is their way of confirming that the identified risks have been resolved. If you don’t make the necessary fixes, you risk having your policy canceled. Trying to switch providers won’t solve the problem, either—a new insurer will conduct their own inspection and flag the same issues. Your best bet is to address the problems head-on. This not only satisfies the insurance company but also makes your home significantly safer for you and your family.
How to Stay Inspection-Ready All Year
Passing a fire inspection isn’t a one-time task; it’s about adopting a long-term commitment to safety. Wildfire risk can change with the seasons, so it’s important to stay proactive. Make a habit of performing regular fire safety assessments on your own. Continue to maintain your defensible space, keep your roof and gutters clean, and test your smoke alarms monthly. By making fire preparedness a regular part of your home maintenance routine, you not only stay ready for any future inspections but also create a consistently safer environment.
Related Articles
- Defensible Space Inspection Cost: What to Expect
- A Guide to Home Ignition Zone Assessment
- Defensible Space Inspection San Diego: A Guide
Frequently Asked Questions
Do I have to be home for the inspection? While some insurers may only conduct an exterior inspection that doesn't require your presence, it's always a good idea to be home if you can. Being there allows you to ask the inspector questions directly and get a better understanding of their findings on the spot. It also gives you a chance to point out recent safety upgrades they might otherwise miss, which can only help your case.
What happens if I don't complete the required repairs in time? If you miss the deadline for required fixes, your insurance company will likely issue a notice of non-renewal or cancellation. This isn't meant to be punitive; it's simply that your property no longer meets their requirements for coverage. If you're struggling to meet the deadline, the best thing you can do is communicate with your insurance agent immediately to see if any extensions are possible.
Can my insurance rates go up after an inspection? It’s possible. An inspection is meant to give your insurer an accurate picture of your home's risk profile. If the inspector finds features that increase your risk—like an old roof or outdated electrical systems—your premium may be adjusted to reflect that. Conversely, demonstrating significant safety improvements and a well-maintained property helps ensure your rate is fair and accurate for the low risk you present.
Is the exterior of my home more important than the interior to an inspector? In areas with high wildfire risk, your home's exterior and the defensible space around it are incredibly important. This is your first line of defense, and inspectors will scrutinize it. However, they look at the complete picture. A fire-hardened exterior won't help if a fire starts inside due to faulty wiring or a poorly maintained furnace. Both the interior and exterior are essential components of your home's overall safety.
What's the difference between a fire inspection and a home appraisal? These two assessments serve very different purposes. A home appraisal is focused on determining the market value of your property, usually for a mortgage or a sale. A home insurance fire inspection is entirely about risk. Its goal is to identify potential hazards that could lead to a fire claim, which helps the insurer understand if your home is a risk they are willing to cover. One is about your home's financial worth, while the other is about its safety and insurability.
What to Do If You're Denied Coverage
Receiving a denial or non-renewal notice from your insurance company can be incredibly stressful, but it’s not the final word. This situation is becoming more common in high-risk fire areas, but you still have options. The first step is to understand exactly why you were denied. Was it due to specific issues found during the inspection, like an old roof or inadequate defensible space? Or was it part of a broader company decision to reduce their exposure in your area? Once you have that information, you can start taking targeted action. This might involve making the necessary repairs and reapplying, or it could mean it’s time to start shopping for a new provider. Having a strong application, complete with documentation of your home’s fire-resistant features and a favorable defensible space assessment, can make a significant difference when approaching new insurers.
Exploring Last-Resort Insurance: The FAIR Plan
If you’ve exhausted your options in the private market, you may still be able to get coverage through your state’s FAIR Plan. These state-run programs act as an insurer of last resort for homeowners who can’t find a policy elsewhere. For example, the California FAIR Plan offers basic fire coverage to ensure you have at least some protection. It’s important to understand that this is not a comprehensive homeowners policy; it typically only covers damage from fire and smoke and doesn’t include liability, theft, or water damage. If you go this route, you’ll likely need to purchase a separate "difference in conditions" policy to fill in those coverage gaps. Think of it as a safety net, not a permanent solution.
Finding a Reputable Insurer
When you’re searching for a new insurance policy, it’s tempting to go with the first company that will approve you. However, it’s crucial to do your homework and choose a reputable provider. Not all insurance companies are created equal, and the last thing you want is to find out your insurer is unreliable when you need to file a claim. You’ll want to look for a company that is financially stable and has a strong track record of paying claims fairly and promptly. Taking the time to vet potential insurers now can save you a massive headache down the road and ensure you have a partner you can count on when it matters most.
Why "Admitted" Insurers Matter
As you compare your options, you’ll want to prioritize what are known as "admitted" insurers. An admitted insurer is one that is licensed and regulated by your state’s department of insurance. This is a big deal because it means the company has to follow state laws regarding how they handle claims, set rates, and communicate with policyholders. If you have a dispute with an admitted insurer, you are protected by your state’s guarantee fund, which can help pay your claims if the company becomes insolvent. Non-admitted, or "surplus lines," insurers don't offer these same consumer protections, making them a riskier choice.
How to Check an Insurer's Financial Strength
An insurance policy is only as good as the company’s ability to pay its claims. Before you sign on the dotted line, take a few minutes to check the insurer’s financial strength rating. Independent agencies evaluate insurance companies and grade them based on their financial health and stability. You can easily look up these ratings on websites like A.M. Best, which is a trusted resource in the industry. Look for companies with high ratings (such as an "A" or better), as this indicates they have a strong financial foundation and are well-positioned to meet their obligations to policyholders, even after a major disaster.
How Pre-Loss Inspections Differ from Post-Fire Investigations
It’s easy to confuse the different types of assessments that insurance companies perform, but a pre-loss inspection and a post-fire investigation serve two very different purposes. The pre-loss inspection, which is the focus of this guide, is a proactive measure. Its goal is to identify and evaluate potential risks *before* anything happens. The inspector is looking for hazards that could lead to a future claim, helping the insurer decide if they are willing to take on the risk of covering your property. In contrast, a post-fire investigation is reactive. It happens *after* a fire has already occurred and is focused on figuring out what happened and why. Understanding this distinction is key to knowing what to expect from each process and what each professional is looking for.
The Role of a Post-Fire Investigator
After a fire, your insurance company will likely send a specialized fire investigator to your property. Unlike the pre-loss inspector who was looking for potential hazards, the post-fire investigator’s job is to piece together the events that led to the fire. They are trained to analyze burn patterns, collect evidence, and interview witnesses to determine the fire’s point of origin and its cause. This is a critical part of the claims process, as the investigator’s findings will help the insurance company determine if the damage is covered under the terms of your policy. Their work is much more like detective work than a routine safety check-up.
Determining a Fire's Origin and Cause
The primary goal of a post-fire investigation is to establish the fire’s "origin and cause." The origin is the specific location where the fire started, while the cause is the event or action that ignited it—for example, an electrical short, a kitchen accident, or arson. This determination is the cornerstone of your insurance claim. If the investigator finds that the fire was caused by a covered peril, your policy will likely pay for the damages. However, if the cause is linked to something excluded from your policy, such as an intentional act, your claim could be denied. This is why the investigator’s work is so thorough and important for the outcome of your claim.